This wiki explains the custom plugins that power CivNodes. Each section covers what the plugin does, the core commands, and tips for getting started. New to a Civ-style server? Start with Citadel. Protecting your blocks is the first thing you'll want to do.
Contents
- Citadel — Block Protection
- Nodes — Territory Claiming
- Prison Pearl — Player Imprisonment
- Factory Mod — Crafting & Research
1) Citadel — Block Protection
Citadel lets you reinforce blocks so they can't be instantly broken by other players. A reinforced block gains hidden "health": each hit chips away at it, so breaking through someone's wall, door, or chest takes real time and effort. Reinforcements are tied to a group, so your friends can share access while everyone else is locked out.
How reinforcement works
- You reinforce a block by spending a reinforcement material (for example stone, iron, or diamond) from your inventory.
- Stronger materials give more health. As a rough guide: stone is cheap and weak, iron is the common mid-tier, and diamond is the strongest and most expensive.
- Reinforcements slowly mature over time. A freshly placed reinforcement is weaker and easier to remove; once matured it reaches full strength. This stops people from instantly locking down land mid-raid.
- When you break your own reinforced block, you get the reinforcement material back. When an enemy breaks it, the material is lost.
Getting started (step by step)
- Gather a stack of reinforcement material (start with stone or iron).
- Run
/ctr group - Left-click the blocks you want to protect. Each click consumes one material and reinforces that block to your default group (your username).
- Run
/cto(Citadel off) when you're done so you don't reinforce by accident. - Switch to
/cti(info mode) and click a block any time to check its reinforcement, group, and remaining health. - Use
/nlAnd navigate the GUI to manage your group. Click the diamond chestplate that represents your group, then the cookie to invite your friends!
Common commands
/ctr <group>— reinforce onto a specific group instead of your default, so group members get access./cto— turn Citadel off (stop reinforcing)./cti— info mode: click a block to see its group, health, and maturation status./ctf— fortification mode: reinforce a block at the same time you place it, straight from your hand./ctb— toggle bypass: break your own reinforcements without the normal hit-by-hit removal.
Tips
- Reinforce everything on your base: walls, floors, chests, doors, and the blocks around chests. Raiders dig through the cheapest path, so don't leave a weak block exposed.
- Set up a group with your friends first, then reinforce onto
that group with
/ctrso everyone can open doors and chests. - Doors and chests can be made accessible to a group while still being reinforced: group members open them normally, while outsiders cannot.
- Use diamond reinforcements for your most important blocks (vaults, perimeter) and cheaper materials for bulk walls.
2) Nodes — Territory Claiming
Nodes are territories you claim to control who is allowed to build and reinforce inside your land. Inside a node you own, outsiders are prevented from placing Citadel reinforcements. That's how you secure your settlement or base.
- A node is tied to a group. Everyone in that group shares permissions over the territory.
- Within your node, only your group can reinforce, keeping enemies from placing reinforced blocks in your land.
- Claiming requires fuel upkeep. Make fuel in the bastion factory in game.
- Oceans cannot be claimed. Ocean chunks typically don't contain nodes, so you can't secure open water. Build your settlement on land to protect it.
Placing a node bastion
A node is created by placing a node bastion. When claiming your node and placing your node bastion:
- It must be placed in fortification mode (
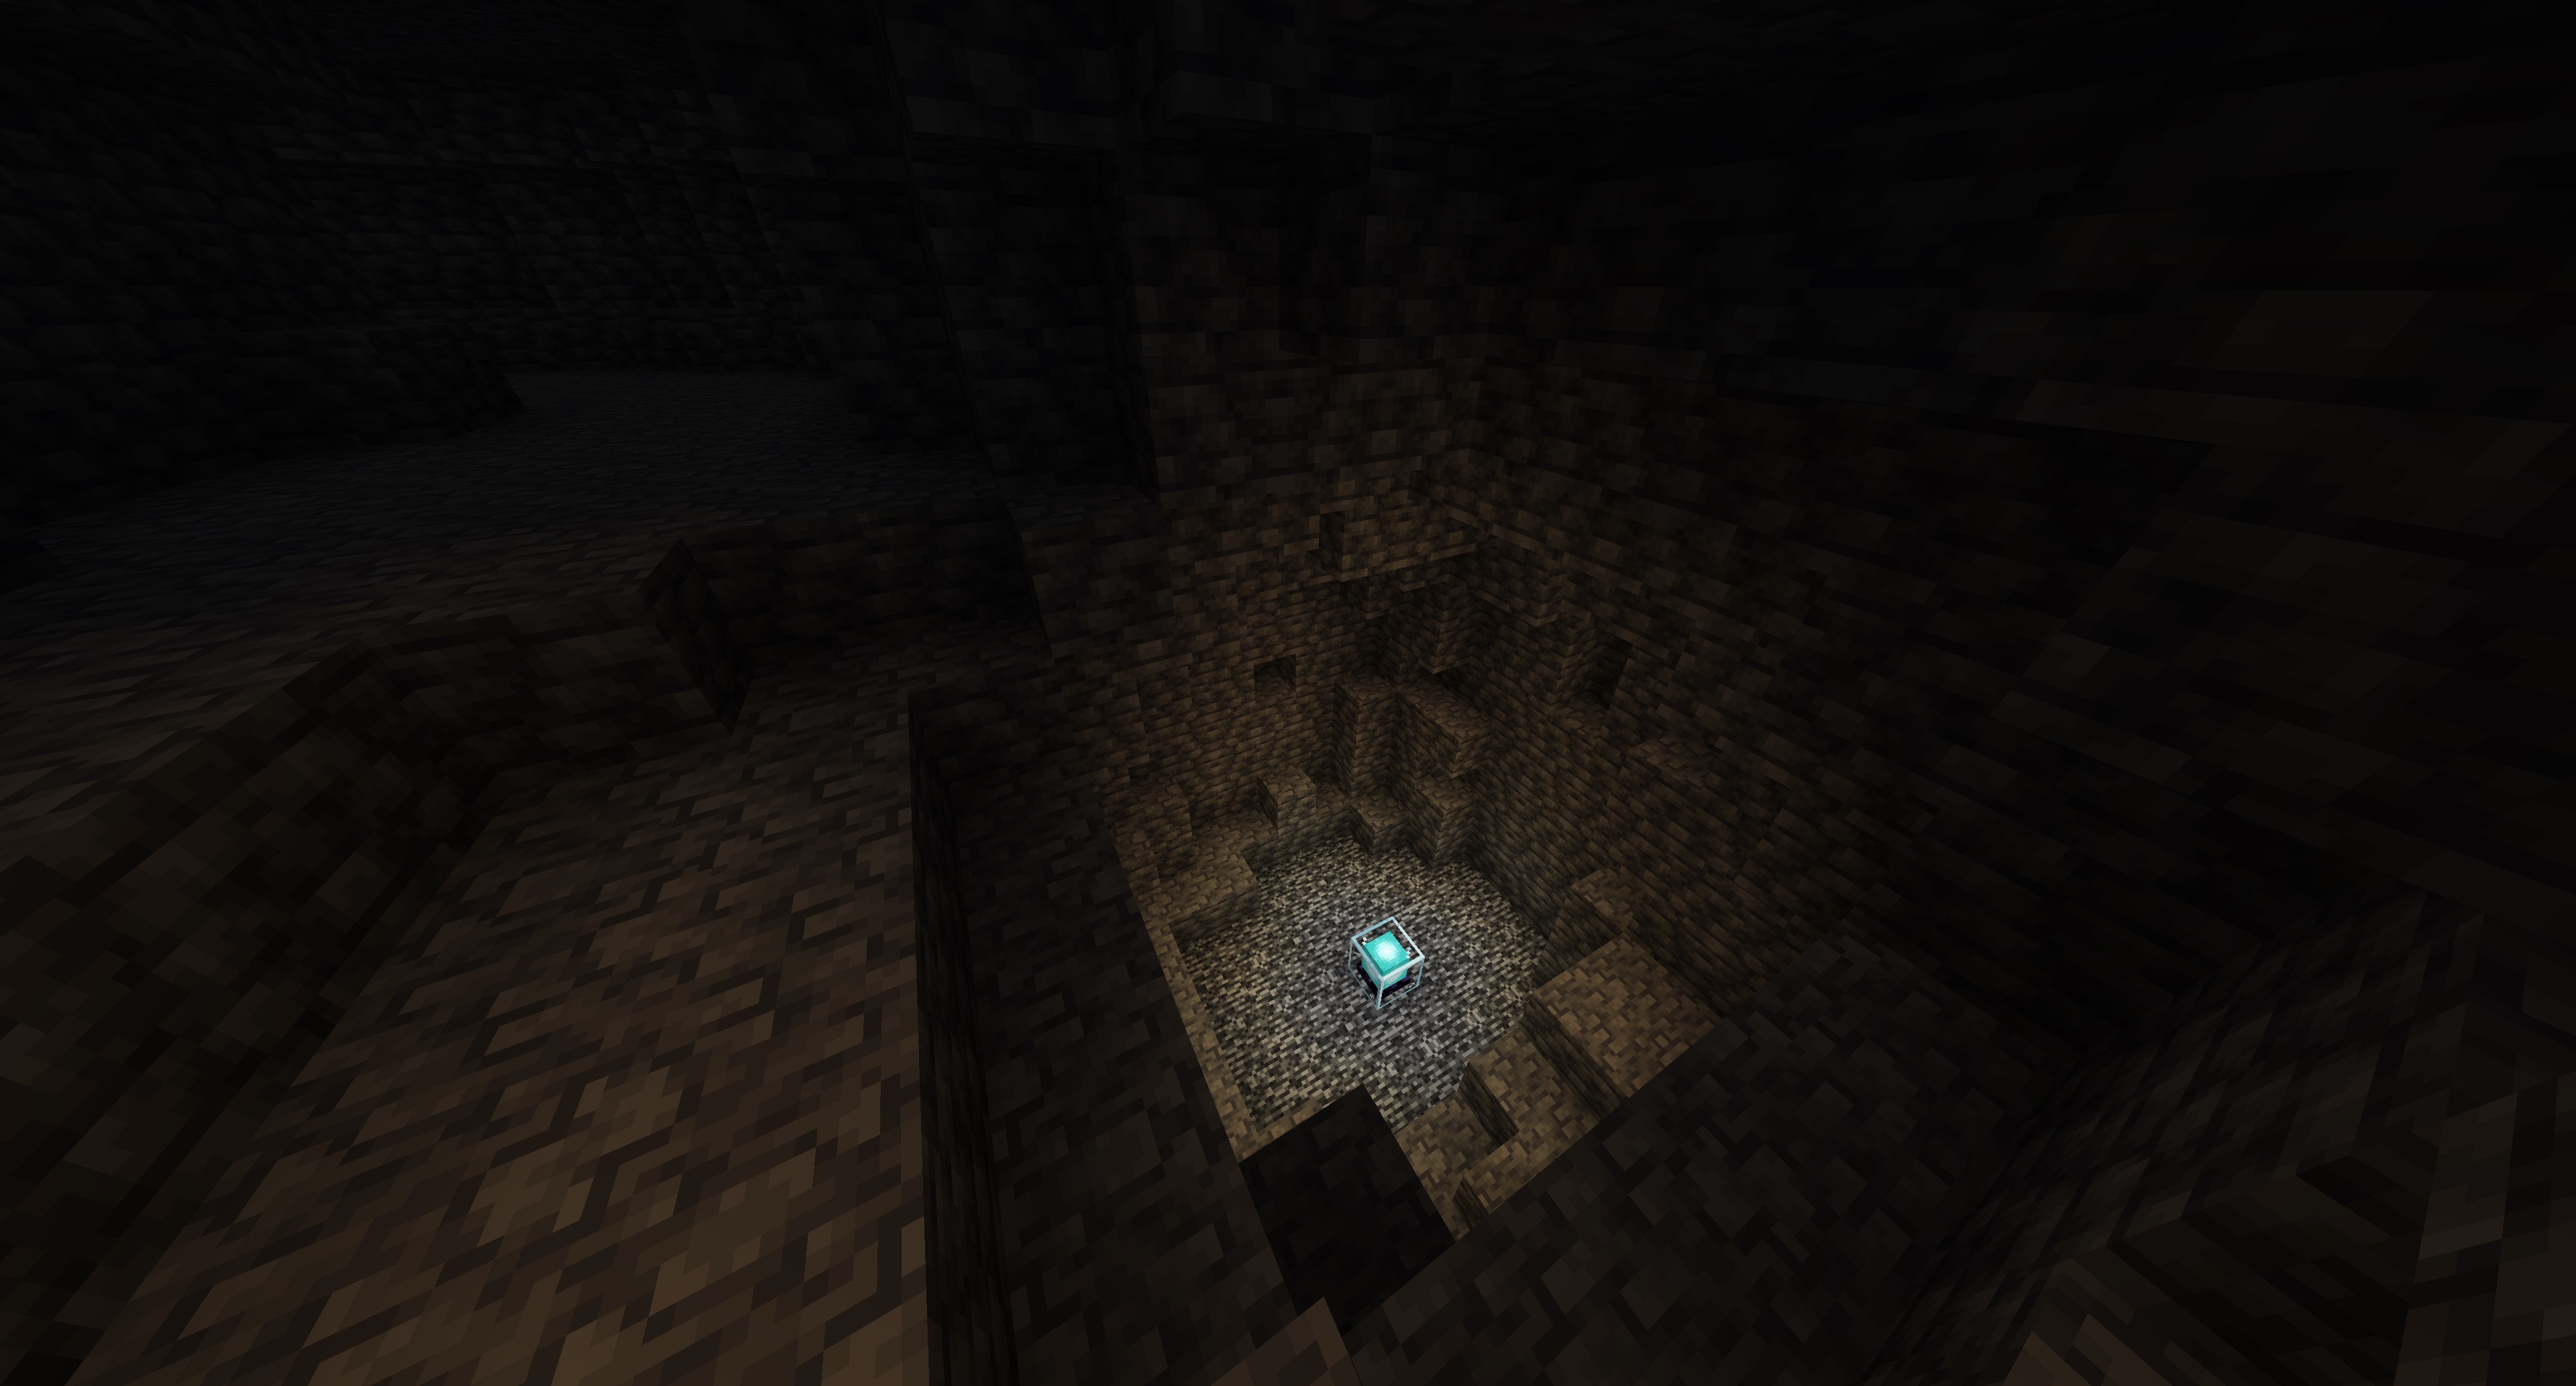
/ctf), the same Citadel mode you use to fortify blocks. (See Citadel for how that mode works.) - It must be placed at bedrock, at the very bottom of the world. You can't put a node bastion anywhere else, so dig all the way down before placing it.
How a node holds up under attack
A node isn't all-or-nothing. At the heart of every node is a home
chunk: the chunk where the node bastion sits. In the in-game map it's
marked with a # symbol. The
node spreads its protection outward from that home chunk like a bubble.
When an enemy tries to reinforce blocks inside your node
(punching blocks with stone, iron, or diamond), the node bastion takes damage and
loses health. As its health drops, the protected bubble shrinks
inward toward the home chunk. The chunks on the outer edge lose
protection first, and the home chunk is always the very last to
fall, with the chunks nearest it close behind. This is also true when the home chunk sits right on the
edge of the node: protection collapses toward the # home chunk, not toward
the node's geometric center.
In the maps below, green chunks are still protected (outsiders can't reinforce there), red chunks have lost protection, and grey or cross-hatched tiles are chunks from other unclaimed nodes.
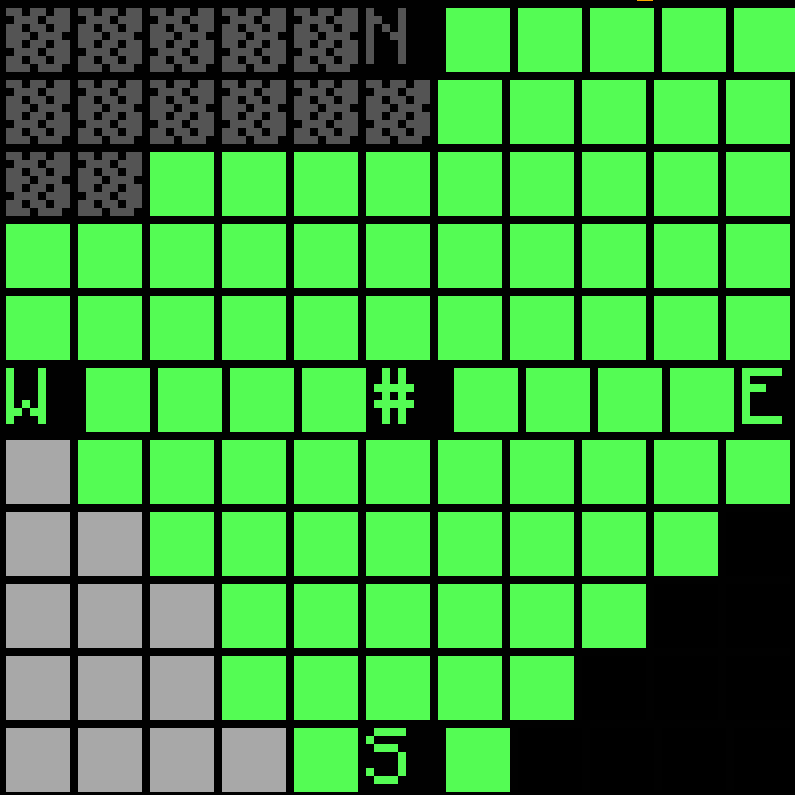

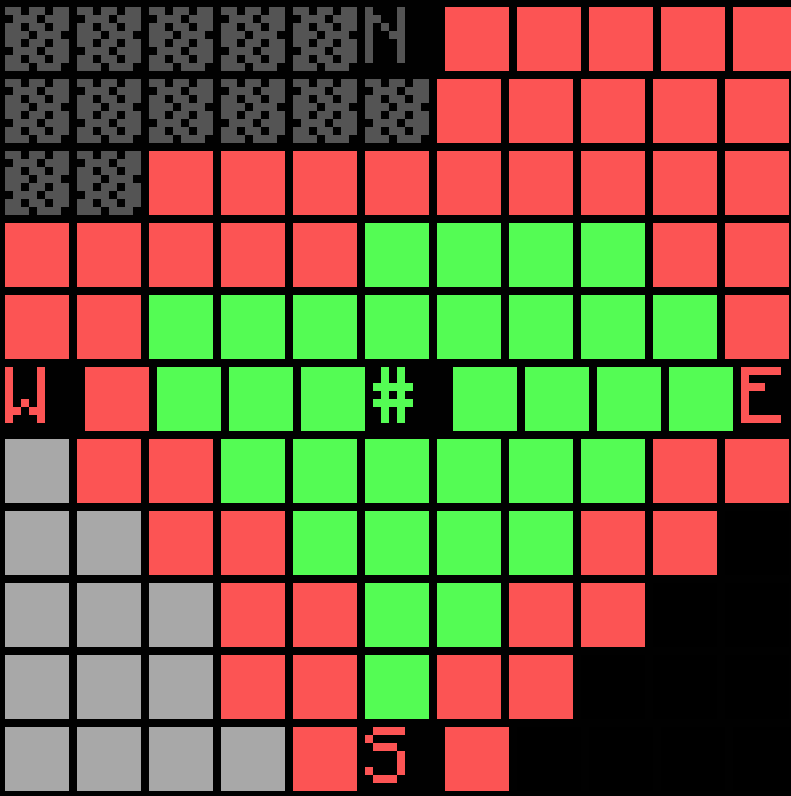
# hold on.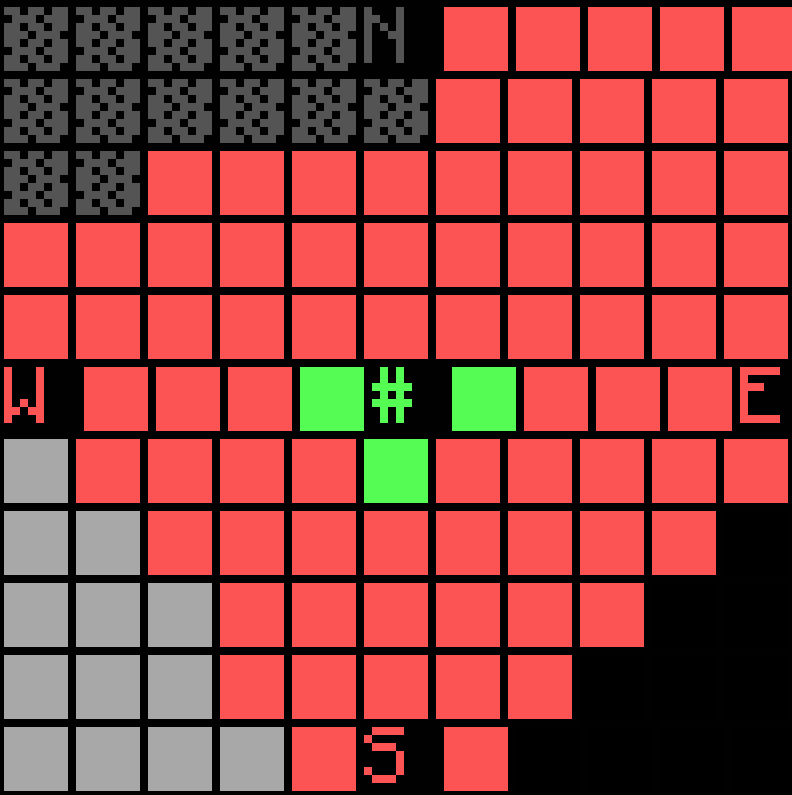
Whether a chunk is protected depends on three things: its distance from the home chunk, its distance to the node's edge, and the node's current health as a fraction of its maximum. Both distances are measured in Manhattan distance (how many chunks you step north/south plus east/west to get there, with no diagonal shortcuts). A chunk stays protected as long as:
(current health ÷ max health) ≥ home distance ÷ (home distance + edge distance)
The right-hand side is just the chunk's position on a 0-to-1 scale running from the
home chunk (0, always protected) out to the node's edge (close to 1, protected only
at near-full health). As the node loses health, that cut-off sweeps inward. Because
the distance to the edge is different in every direction, the protected area keeps
the node's own shape as it shrinks back toward the #, so it isn't a
simple circle or diamond. At half health, the cut-off sits roughly where a chunk is
as far from the home as it is from the edge. Defend the perimeter to keep the
bastion's health up; if it gets worn down, protection retreats chunk by chunk back to
the #.
Groups
Groups are the backbone of both Nodes and Citadel. Create a group for your town, add trusted players, and assign them roles (such as member, moderator, or owner). Then reinforce and claim onto that group so the whole town shares access.
- Create a group, then invite players to it.
- Assign ranks so moderators can manage members but only owners can disband.
- Use the group name with
/ctr or /ctf <group>when reinforcing.
3) Prison Pearl — Player Imprisonment
Prison Pearl changes what happens when you defeat someone. If you kill a player with an ender pearl, instead of just dying they become imprisoned inside the pearl and are teleported to The End until they're freed.
- Land the killing blow with an enderpearl in your hotbar to "pearl" your target.
- The imprisoned player is held in The End and cannot return to the overworld until released.
- Whoever holds the pearl controls the prisoner, so keep it safe (a reinforced vault is ideal). If the pearl is broken or dropped, the prisoner may be freed.
- Home-territory protection: if a player is pearled inside their own territory, their imprisonment is capped at 7 days, after which they are automatically released.
Prison Pearl makes PvP meaningful: instead of an enemy respawning instantly, you can hold them hostage, negotiate, or remove a threat from the map for a while.
4) Factory Mod — Crafting & Research
Factory Mod lets you build factories to research and manufacture better items, gear, and weapons that you can't make with vanilla crafting alone. Factories turn raw materials into advanced output over time, rewarding infrastructure and cooperation.
What a factory looks like
Every factory is built from three blocks: a crafting table, a furnace, and a chest placed next to each other, like this:

How factories work
- Build the structure: place a furnace, crafting table, and chest together in the shape shown above.
- Add the creation items: put the materials needed to create that factory into the chest.
- Create it: hit the factory with a stick. If the right creation items are present, the structure becomes a working factory.
- Fuel and feed it: put charcoal in the furnace and the input materials for your chosen recipe into the factory's chest.
- Run a recipe: activate the factory to begin production. It runs over time and deposits the finished items.
Not sure what a factory needs to be created? Run /fm to open a menu
that lists the creation items for every factory, so you can see
exactly what to gather and place in the chest.
- Recipes can require research or upgrades before higher-tier items become available.
- Factories consume fuel while running, so keep a steady supply on hand.
- Protect your factories with Citadel. An unreinforced factory can be destroyed or looted by raiders.
Exact recipes, costs, and health values are configured by the server and may change. Check in-game help and the Discord for the latest details.